VideoStitch
VideoStitch is a software program that imports the multiple videos transferred by Media Mover...
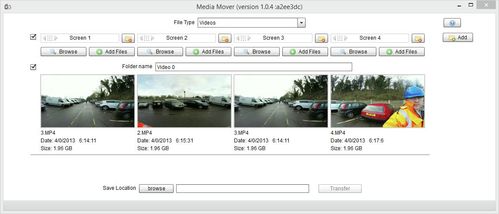
...and combines them into one panoramic video for display in a Mission Room display system.

The complete VideoStitch User Guide is available, but the steps below give a quick overview of how to create a panoramic video.
Start VideoStitch
Start VideoStitch by double clicking the icon on the desktop.
Add Files
Ensure the Source Tab on the top right is selected.
Use windows to browse to the folder where Media Mover created your video folders and files.
Select a set of 4 video files from a folder, and drag and drop them onto the VideoStitch application.
If you wish to change the order of the files, use the Replace button to change the source each file in turn.
Apply Calibration file (VideoStitch Version 1)
VideoStitch Version 1 uses calibration files to merge the separate videos into one seamless whole.
Four alternate calibration files particular to your Mission Cam 4 and can be found on your Mission Edit system in Desktop/Calibration Files.
- Apply the calibration file by choosing 'Calibration/ Apply Calibration...' and browsing to one of the files provided in the above location
- If the result is unsatisfactory, repeat step one, choosing an alternate file each time until the best results are obtained.
NOTE: Applying a new calibration file will reset some output settings, so ensure these are correct before processing (see below).
Save your videostitch project by selecting File/Save and select a file name and location.
Apply Automatic calibration (VideoStitch Version 2)
VideoStitch Version 2 uses in-built calibration to merge the separate videos into one seamless whole.
- Choose 'Window/Calibration' and the Calibration window will appear.
- Leave all settings at their defaults and click the Calibrate on Sequence button to begin the calibration. The program will compare videos at different points in time to merge them correctly.
- If the results are unsatisfactory, revert to the method above for VideoStitch Version 1.
Save your videostitch project by selecting File/Save and select a file name and location.
Synchronisation
Sometimes not all source videos will have the same start and end times.
This causes features to appear and disappear from different camera views at different times.
To correct this problem use the synchronise feature.
Ensure the Output Tab on the top right is selected to view the stitched panorama.
Click Window/Synchronization to show the synch tools panel on the left.
Best results are obtained by scrubbing the video back and forth, watching as features move from one camera to another.
Use the spinner values to move each video forwards and backwards in time until features move across the transition areas smoothly.
NOTE: If you cannot see the full extents of your panorama you can scroll the image by clicking on the panorama and dragging left or right.
Export a video
Select a section of video
Choose a section of the video to output by using the time controls at the bottom of the window.
Use the ‘start time‘ & ‘stop time‘ buttons to set the in and out points of the working sequence.
Process
To create your panoramic video output, click the Process tab.
Change the output settings to those listed below:
- Blender: Linear(Fast)
- Lock Ratio: Deselected
- Width: 5120
- Height: 720
- Output Format: mp4
- Codec: mpeg4
- Bitrate Mode: VBR
- Bitrate (kbps): 30,000
Should you wish audio to be included in your output file click the Copy Audio from box and choose an input file as the source from the drop down list (if unsure choose the first file in the list).
Leave all the other settings at their defaults.
Select the output file name and path by clicking the Browse... button and choosing the desired location and file name.
Click File/Save before processing.
When you are ready, Click the Process Now button to begin.
The output process can take some time. When it is complete browse to the chosen output directory to view the resultant image.
Export an image
Select a single frame of video
Choose a single frame of the video to output by using the time controls at the bottom of the window.
Use the ‘start time‘ & ‘stop time‘ buttons to set the in and out points to the required point in time.

Process
To create your panoramic image output, click the Process tab.
Change the output settings to those listed below:
- Blender: Linear(Fast)
- Lock Ratio: Deselected
- Width: 5120
- Height: 720
- Output Format: jpg
- Quality: 99
Audio cannot be included in your image file.
Leave all the other settings at their defaults.
Select the output file name and path by clicking the Browse... button and choosing the desired location and file name.
Click File/Save before processing.
When you are ready, Click the Process Now button to begin. Browse to the chosen output directory to view the resultant image.
Viewing your results
- You can view the output on your Mission Edit PC by double clicking the output file to launch it. Videos will openin VLC Media Player. Images will open in the windows default image viewer.
- You can also transfer your panoramic media directly onto your Mission Room Display system by copying it to a drive location on the Mission Room Server. Play the file by using the file system browser on the handset to select it.
- Alternatively you can add it to an Immersive PowerPoint Presentation and transfer that to the Mission Room Server in the same way.