Media Mover is a software program that copies and organises files captured by a Mission Cam system in preparation for their conversion into a panorama by VideoStitch
Media Mover also concatenates the truncated videos, if GoPro has truncated them because of size.
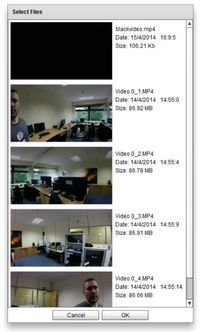
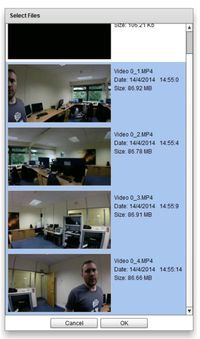
Selecting Files
A new 'Select Files' window will appear, with thumbnail images starting with 'blackvideo.mp4' showing the files in the selected folder.
To select a single file: Click to select a single file
To select multiple files: Hold down the control key (ctrl) and click multiple files
To select a sequence of files: Hold down the shift key, select the first video then scroll to and click the last file in the desired sequence.
Click 'OK', the files will be added to the current screen on the main window.
 |  |
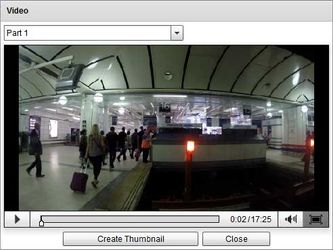
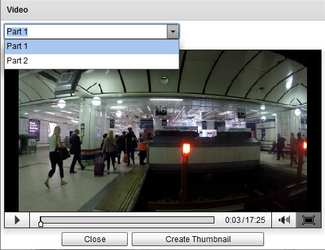
Preview
When hovering over each thumbnail image, a small rectangle will appear at the top of the thumbnail image.
Click to preview the video.
Check for the available thumbnail. If the thumbnail is not representative of the video content, play and pause the video until you find a clearer image and then click 'Create Thumbnail'.
If the video is a set of truncated videos, you can play each truncated part separately by selecting it from the drop-down menu. You can even select a better image for thumbnail from any of the truncated parts.
This makes it easier to recognise which sets of videos belong together and in what order they should be arranged.
|   |
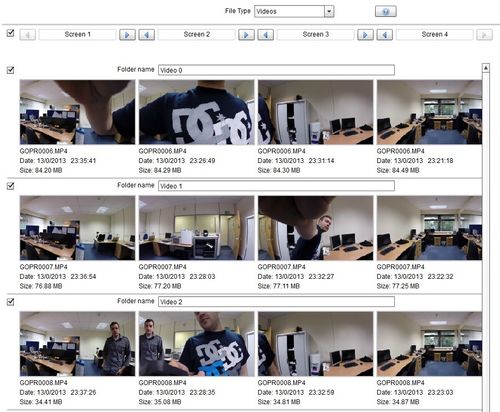
Build a file sequence
The previous process can be repeated as many times as is needed to build a grid of files, arranged in columns and rows
The number of rows and columns depends on the number of cameras used and the number of separate shots created. Typically you will transfer data from a set of four SD cards.
Hover over the screen label to access 'Browse', 'Add Files' and 'Remove folder' buttons.
Browsing Files
Click the 'Browse' button.
A selection box marked 'Choose a folder' will open. Browse to the drive and folder that contains your videos.
The folder you finally select will have no files visible in it nevertheless, click 'Select Folder'.
Adding Files
Click the 'Add Files' button.
'Select Files' window will appear, having the files selected while adding the column previously.
Removing Folder
Click the 'Remove Folder' button.
That particular column will get deleted from the display, and the columns to the right will move towards left.
Order the columns correctly
To create a correctly aligned panorama it is important to ensure the files are in the correct order when viewed left to right on the row.
Identify features near each edge of the image - matching them with the same features in the adjacent thumbnails.
You can change the order of the files by moving the columns.
Columns can be moved left and right by clicking the left and right arrows on both sides of screen label.
NOTE: If the GoPro cameras have been removed and replaced in the Mission Cam housing in the wrong order, the sequnce of files could be different from one row to another. or if the GoPro cameras have truncated the videos into parts. In these cases eventually:
- Identify groups of rows which were captured with the cameras in the same orientation
- Click the check boxes at the start of each row, selecting the rows identified in step 1
- Ensure the column order is correct as described above.
- Transfer these files by following the transfer process described below.
- Go back to step one selecting other groups of similar orientated files, repeating the process until you have transferred all the files you require.
- This process will ensure that all the transferred files will have a consistent arrangement and orientation, and the truncated files are concatenated into one single file.


Order the rows correctly
If the number of files on the columns are not identical this may cause one or more rows to misalign. You can correct this by adding or removing files to each column as required.
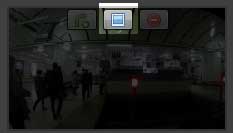
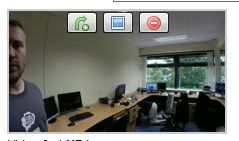
Hover over the file thumbnails to access the file manipulation buttons
Insert a file above
Files can be inserted to the column by clicking on the green insert above button on the left hand side.
If a file is missing from a sequence or is unusable you can insert a placeholder file (blackvideo.mp4) to ensure the following videos are matched up correctly with those on the left or right.
Remove a file
If a file is not required, it can be removed by clicking the red 'delete' button.
Preview
The video can be previewed again by clicking the middle preview button.
Transfer files
To start the transfer process, click 'browse' at the bottom of the screen and choose file location.
Navigate to a location on your hard drive or an external drive.
Create a new sub-directory if required and click 'select folder'
![]()
![]()
Click 'Transfer'
The transfer window will open.
You will see a thumbnail of the current file being transferred, and a progress bar just below shows the transfer progress of that file.
Items appear on the list below as they are successfully transferred.
Another progress bar at the bottom shows the overall transfer progress with respect to all the files getting transferred.
Click the 'Cancel' button to stop the transfer process.
Click the 'Close' button to return to the media mover interface.
When the transfer process has completed you can click on an item (having folder path) in the list to open its folder location.
![]()